一、常见Web安全漏洞
常见Web安全漏洞
0x01XSS攻击
1.什么是XSS攻击手段
XSS攻击使用Javascript脚本注入进行攻击
例如在提交表单后,展示到另一个页面,可能会受到XSS脚本注入,读取本地cookie远程发送给黑客服务器端。
1 |
|
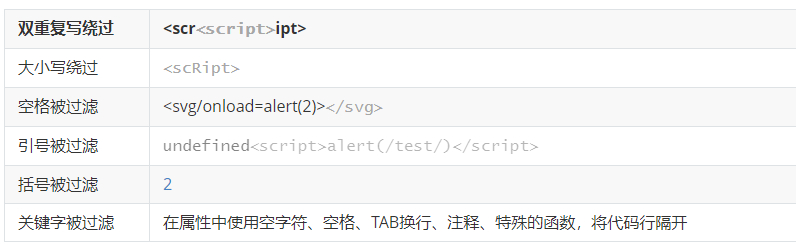
1 | '>undefined<script>alert(document.cookie)</script> |
最好使用火狐浏览器演示效果
2.如何防御XSS攻击
将脚本特殊字符,转换成html源代码进行展示。
汉子编码http://www.mytju.com/classcode/tools/encode_gb2312.asp
步骤:编写过滤器拦截所有getParameter参数,重写httpservletwrapp方法
将参数特殊字符转换成html源代码保存.
0x02SQL注入攻击
1.什么是SQL注入
SQL注入:利用现有应用程序,将(恶意)的SQL命令注入到后台数据库执行一些恶意的作。
造成SQL注入的原因是因为程序没有有效过滤用户的输入,使攻击者成功的向服务器提交恶意的SQL查询代码,程序在接收后错误的将攻击者的输入作为查询语句的一部分执行,导致原始的查询逻辑被改变,额外的执行了攻击者精心构造的恶意代码
2.SQL注入防攻击手段
不要使用拼接SQL语句方式、最好使用预编译方式,在mybatis编写sql语句的时候,最好使用?传参数方式,不要使用#传参数,因为#传参数方式,可能会受到sql语句攻击。
演示案例:
http://127.0.0.1:8080/login?userName='liusi'&password='123'
http://127.0.0.1:8080/login?userName='liusi'&password='123' or 1=1
3.MyBatis #与?区别
#{}: 解析为一个 JDBC 预编译语句(prepared statement)的参数标记符,一个 #{ } 被解析为一个参数占位符,可以防止SQL注入问题。
${}: 仅仅为一个纯碎的 string 替换,在动态 SQL 解析阶段将会进行变量替换。
4.SQL万能密码
1 | 'or'='or' |
0x03Http请求防盗链
1.什么是防盗链
比如A网站有一张图片,被B网站直接通过img标签属性引入,直接盗用A网站图片展示。
2.如何实现防盗链
判断http请求头Referer域中的记录来源的值,如果和当前访问的域名不一致的情况下,说明该图片可能被其他服务器盗用。
使用过滤器判断请求头Referer记录请求来源
1 |
|
注意测试的时候,最好开启两个不同的浏览器测试,避免图片缓存的原因
0x04CSRF攻击
1.CSRF攻击产生的原因
(Cross Site Request Forgery, 跨站域请求伪造)是一种网络的攻击方式,它在 2007 年曾被列为互联网 20 大安全隐患之一,也被称为“One Click Attack”或者Session Riding,通常缩写为CSRF或者XSRF,是一种对网站的恶意利用也就是人们所知道的钓鱼网站。尽管听起来像跨站脚本(XSS),但它与XSS非常不同,并且攻击方式几乎相左。XSS利用站点内的信任用户,而CSRF则通过伪装来自受信任用户的请求来利用受信任的网站。与XSS攻击相比,CSRF攻击往往不大流行(因此对其进行防范的资源也相当稀少)和难以防范,所以被认为比XSS更具危险性。
2.API接口幂等性设计
API接口幂等性设计方案
MVCC方案
多版本并发控制,该策略主要使用 update with condition(更新带条件来防止)来保证多次外部请求调用对系统的影响是一致的。在系统设计的过程中,合理的使用乐观锁,通过 version 或者 updateTime(timestamp)等其他条件,来做乐观锁的判断条件,这样保证更新操作即使在并发的情况下,也不会有太大的问题。例如
select * from tablename where condition=#condition# // 取出要跟新的对象,带有版本 versoin
update tableName set name=#name#,version=version+1 where version=#version#
在更新的过程中利用 version 来防止,其他操作对对象的并发更新,导致更新丢失。为了避免失败,通常需要一定的重试机制。
去重表
在插入数据的时候,插入去重表,利用数据库的唯一索引特性,保证唯一的逻辑。
悲观锁
select for update,整个执行过程中锁定该订单对应的记录。注意:这种在 DB 读大于写的情况下尽量少用。
Token机制,防止页面重复提交
业务要求:页面的数据只能被点击提交一次
发生原因:由于重复点击或者网络重发,或者 nginx 重发等情况会导致数据被重复提交
解决办法:
集群环境:采用 token 加 redis(redis 单线程的,处理需要排队)
单 JVM 环境:采用 token 加 redis 或 token 加 jvm 内存
处理流程:
数据提交前要向服务的申请 token,token 放到 redis 或 jvm 内存,token 有效时间
提交后后台校验 token,同时删除 token,生成新的 token 返回
token 特点:要申请,一次有效性,可以限流
基于Token方式防止API接口幂等
客户端每次在调用接口的时候,需要在请求头中,传递令牌参数,每次令牌只能用一次。
一旦使用之后,就会被删除,这样可以有效防止重复提交。
步骤:
生成令牌接口
接口中获取令牌验证
生成令牌接口
public class TokenUtils { private static Map<String, Object> tokenMap = new ConcurrentHashMap<String, Object>(); // 获取token public static synchronized String getToken() { // 1.生成令牌 String token = "token-" + System.currentTimeMillis(); // 2.存入tokenMap tokenMap.put(token, token); return token; } // 验证token,并且删除对应的token public static Boolean exisToken(String token) { // 1.从集合中获取token Object result = tokenMap.get(token); if (result == null) { return false; } // 2.删除对应的token tokenMap.remove(token); return true; }}
接口中获取令牌验证
@RestControllerpublic class OrderController { @Autowired private OrderMapper orderMapper; // 获取Token @RequestMapping("/getToken") public String getToken() { return TokenUtils.getToken(); } // 验证Token @RequestMapping(value = "/addOrder", produces = "application/json; charset=utf-8") public String addOrder(@RequestBody OrderEntity orderEntity, HttpServletRequest request) { String token = request.getHeader("token"); if (StringUtils.isEmpty(token)) { return "参数错误!"; } if (!TokenUtils.exisToken(token)) { return "请勿重复提交!"; } int result = orderMapper.addOrder(orderEntity); return result > 0 ? "添加成功" : "添加失败" + ""; } }
3.防御CSRF攻击手段
使用图形验证码防止机器模拟接口请求攻击,在调用核心业务接口时,比如支付、下单、等接口,最好使用手机短信验证验证或者是人脸识别,防止其他用户使用Token伪造请求。
0x05忘记密码漏洞
黑客使用抓包工具分析Http请求,在忘记密码找回时,需要发送一套短信验证码,如果验证码数字比较短的话,很容易使用暴力破解方式攻击破。
防御手段:
忘记密码验证码最好在6-8位。
一旦频繁调用接口验证时,应该使用图形验证码拦截,防止机器模拟。
使用黑名单和白名单机制,防御攻击。
0x06上传文件漏洞
1.漏洞描述
上传漏洞这个顾名思义,就是攻击者通过上传木马文件,直接得到WEBSHELL,危害等级超级高,现在的入侵中上传漏洞也是常见的漏洞。
导致该漏洞的原因在于代码作者没有对访客提交的数据进行检验或者过滤不严,可以直接提交修改过的数据绕过扩展名的检验。
2.漏洞危害
1)可以得到WEBSHELL
2)上传木马文件,可以导致系统瘫痪
Tomcat虚拟地址:
F:\itmayiedujiangke2018-06-12.metadata.plugins\org.eclipse.wst.server.core\tmp0\wtpwebapps\tomcat_web
3.环境搭建
Maven依赖
Index.jsp
<%@ page language=*"java"* contentType=*"text/html; charset=UTF-8"* pageEncoding=*"UTF-8"%>undefined<meta http-equiv="Content-Type"* content=*"text/html; charset=UTF-8">
UploadServlet
public class UploadServletextends HttpServlet { /** * 文件上传 / *protected** void doPost(HttpServletRequest request, HttpServletResponse response) { String root = request.getServletContext().getRealPath("/upload"); DiskFileItemFactory factory = new DiskFileItemFactory(); ServletFileUpload upload = new ServletFileUpload(factory); try { List
脚本文件
创建一个a.jsp
<%@page import="java.io.File"%><%@ page language="java" contentType="text/html; charset=utf-8" pageEncoding="utf-8"%><% String root ="F:\itmayiedu"; File file = new File(root); file.delete();%>
4.修复方案
1)对文件格式限制,只允许某些格式上传
2)对文件格式进行校验,前端跟服务器都要进行校验(前端校验扩展名,服务器校验扩展名、Content_Type等)
3)将上传目录防止到项目工程目录之外,当做静态资源文件路径,并且对文件的权限进行设定,禁止文件下的执行权限。
判断文件流是否为图片格式
/* * 文件上传 / *protected** void doPost(HttpServletRequest request, HttpServletResponse response) { String root = request.getServletContext().getRealPath("/upload"); DiskFileItemFactory factory = new DiskFileItemFactory(); ServletFileUpload upload = new ServletFileUpload(factory); try { List
0x07其他攻击和漏洞
直接异常信息,会给攻击者以提示。 可以使用mvc中的工具,把错误码异常等进行封装
HTML注释, 会暴露功能,方便攻击。 上线时去除注释
文件上传, 如果本身功能就是上传文件去执行,那么就有可能执行非常危险的命令。 解决方式是,设置文件白名单,限制文件类型,另外还可以重新命名文件,改名为不可执行的
路径遍历, 使用相对路径来遍历未开放的目录。 方式是将JS,CSS部署在独立的服务器,使用独立域名。 其他文件不使用静态URL访问,动态参数不包含文件路径信息。
二、互联网API接口幂等设计
BaseRedisService封装Redis
@Componentpublic class BaseRedisService { @Autowired private StringRedisTemplate stringRedisTemplate; public void setString(String key, Object data, Long timeout) { if (data instanceof String) { String value = (String) data; stringRedisTemplate.opsForValue().set(key, value); } if (timeout != null) { stringRedisTemplate.expire(key, timeout, TimeUnit.SECONDS); } } public Object getString(String key) { return stringRedisTemplate.opsForValue().get(key); } public void delKey(String key) { stringRedisTemplate.delete(key); } }
RedisTokenUtils工具类
@Componentpublic class RedisTokenUtils { private long timeout = 60 * 60; @Autowired private BaseRedisService baseRedisService; // 将token存入在redis public String getToken() { String token = "token" + System.currentTimeMillis(); baseRedisService.setString(token, token, timeout); return token; } public boolean findToken(String tokenKey) { String token = (String) baseRedisService.getString(tokenKey); if (StringUtils.isEmpty(token)) { return false; } // token 获取成功后 删除对应tokenMapstoken baseRedisService.delKey(token); return true; } }
自定义Api幂等注解和切面
@Target(value = ElementType.METHOD)@Retention(RetentionPolicy.RUNTIME)public @interface ExtApiIdempotent { String value();}
@Aspect@Componentpublic class ExtApiAopIdempotent { @Autowired private RedisTokenUtils redisTokenUtils; @Pointcut("execution(public * com.itmayiedu.controller..(..))") public void rlAop() { } @Around("rlAop()") public Object doBefore(ProceedingJoinPoint proceedingJoinPoint) throws Throwable { MethodSignature signature = (MethodSignature) proceedingJoinPoint.getSignature(); ExtApiIdempotent extApiIdempotent = signature.getMethod().getDeclaredAnnotation(ExtApiIdempotent.class); if (extApiIdempotent == null) { // 直接执行程序 Object proceed = proceedingJoinPoint.proceed(); return proceed; } // 代码步骤: // 1.获取令牌 存放在请求头中 HttpServletRequest request = getRequest(); String token = request.getHeader("token"); if (StringUtils.isEmpty(token)) { response("参数错误!"); return null; } // 2.判断令牌是否在缓存中有对应的令牌 // 3.如何缓存没有该令牌的话,直接报错(请勿重复提交) // 4.如何缓存有该令牌的话,直接执行该业务逻辑 // 5.执行完业务逻辑之后,直接删除该令牌。 if (!redisTokenUtils.findToken(token)) { response("请勿重复提交!"); return null; } Object proceed = proceedingJoinPoint.proceed(); return proceed; } public HttpServletRequest getRequest() { ServletRequestAttributes attributes = (ServletRequestAttributes) RequestContextHolder.getRequestAttributes(); HttpServletRequest request = attributes.getRequest(); return request; } public void response(String msg) throws IOException { ServletRequestAttributes attributes = (ServletRequestAttributes) RequestContextHolder.getRequestAttributes(); HttpServletResponse response = attributes.getResponse(); response.setHeader("Content-type", "text/html;charset=UTF-8"); PrintWriter writer = response.getWriter(); try { writer.println(msg); } catch (Exception e) { } finally { writer.close(); } } }
幂等注解使用
// 从redis中获取Token @RequestMapping("/redisToken") public String RedisToken() { return redisTokenUtils.getToken(); } // 验证Token @RequestMapping(value = "/addOrderExtApiIdempotent", produces = "application/json; charset=utf-8") @ExtApiIdempotent public String addOrderExtApiIdempotent(@RequestBody OrderEntity orderEntity, HttpServletRequest request) { int result = orderMapper.addOrder(orderEntity); return result > 0 ? "添加成功" : "添加失败" + ""; }
封装生成token注解
@Target(value = ElementType.METHOD)@Retention(RetentionPolicy.RUNTIME)public @interface ExtApiToken { }
改造ExtApiAopIdempotent
@Aspect@Componentpublic class ExtApiAopIdempotent { @Autowired private RedisTokenUtils redisTokenUtils; @Pointcut("execution(public * com.itmayiedu.controller..(..))") public void rlAop() { } // 前置通知转发Token参数 @Before("rlAop()") public void before(JoinPoint point) { MethodSignature signature = (MethodSignature) point.getSignature(); ExtApiToken extApiToken = signature.getMethod().getDeclaredAnnotation(ExtApiToken.class); if (extApiToken != null) { extApiToken(); } } // 环绕通知验证参数 @Around("rlAop()") public Object doAround(ProceedingJoinPoint proceedingJoinPoint) throws Throwable { MethodSignature signature = (MethodSignature) proceedingJoinPoint.getSignature(); ExtApiIdempotent extApiIdempotent = signature.getMethod().getDeclaredAnnotation(ExtApiIdempotent.class); if (extApiIdempotent != null) { return extApiIdempotent(proceedingJoinPoint, signature); } // 放行 Object proceed = proceedingJoinPoint.proceed(); return proceed; } // 验证Token public Object extApiIdempotent(ProceedingJoinPoint proceedingJoinPoint, MethodSignature signature) throws Throwable { ExtApiIdempotent extApiIdempotent = signature.getMethod().getDeclaredAnnotation(ExtApiIdempotent.class); if (extApiIdempotent == null) { // 直接执行程序 Object proceed = proceedingJoinPoint.proceed(); return proceed; } // 代码步骤: // 1.获取令牌 存放在请求头中 HttpServletRequest request = getRequest(); String valueType = extApiIdempotent.value(); if (StringUtils.isEmpty(valueType)) { response("参数错误!"); return null; } String token = null; if (valueType.equals(ConstantUtils.EXTAPIHEAD)) { token = request.getHeader("token"); } else { token = request.getParameter("token"); } if (StringUtils.isEmpty(token)) { response("参数错误!"); return null; } if (!redisTokenUtils.findToken(token)) { response("请勿重复提交!"); return null; } Object proceed = proceedingJoinPoint.proceed(); return proceed; } public void extApiToken() { String token = redisTokenUtils.getToken(); getRequest().setAttribute("token", token); } public HttpServletRequest getRequest() { ServletRequestAttributes attributes = (ServletRequestAttributes) RequestContextHolder.getRequestAttributes(); HttpServletRequest request = attributes.getRequest(); return request; } public void response(String msg) throws IOException { ServletRequestAttributes attributes = (ServletRequestAttributes) RequestContextHolder.getRequestAttributes(); HttpServletResponse response = attributes.getResponse(); response.setHeader("Content-type", "text/html;charset=UTF-8"); PrintWriter writer = response.getWriter(); try { writer.println(msg); } catch (Exception e) { } finally { writer.close(); } } }
API接口保证幂等性
@RestControllerpublic class OrderController { @Autowired private OrderMapper orderMapper; @Autowired private RedisTokenUtils redisTokenUtils; // 从redis中获取Token @RequestMapping("/redisToken") public String RedisToken() { return redisTokenUtils.getToken(); } // 验证Token @RequestMapping(value = "/addOrderExtApiIdempotent", produces = "application/json; charset=utf-8") @ExtApiIdempotent(value = ConstantUtils.EXTAPIHEAD) public String addOrderExtApiIdempotent(@RequestBody OrderEntity orderEntity, HttpServletRequest request) { int result = orderMapper.addOrder(orderEntity); return result > 0 ? "添加成功" : "添加失败" + ""; }}
页面防止重复提交
@Controllerpublic class OrderPageController { @Autowired private OrderMapper orderMapper; @RequestMapping("/indexPage") @ExtApiToken public String indexPage(HttpServletRequest req) { return "indexPage"; } @RequestMapping("/addOrderPage") @ExtApiIdempotent(value = ConstantUtils.EXTAPIFROM) public String addOrder(OrderEntity orderEntity) { int addOrder = orderMapper.addOrder(orderEntity); return addOrder > 0 ? "success" : "fail"; } }
0x08API安全接口安全设计
1.互联网开放平台设计
1.需求:现在A公司与B公司进行合作,B公司需要调用A公司开放的外网接口获取数据,
如何保证外网开放接口的安全性。
2.常用解决办法:
2.1 使用加签名方式,防止篡改数据
2.2 使用Https加密传输
2.3 搭建OAuth2.0认证授权
2.4 使用令牌方式
2.5 搭建网关实现黑名单和白名单
2.URL转码
什么是URL转码
不管是以何种方式传递url时,如果要传递的url中包含特殊字符,如想要传递一个+,但是这个+会被url会被编码成空格,想要传递&,被url处理成分隔符。
尤其是当传递的url是经过Base64加密或者RSA加密后的,存在特殊字符时,这里的特殊字符一旦被url处理,就不是原先你加密的结果了。
url特殊符号及对应的编码:
| 符号 | url**中的含义** | 编码 |
|---|---|---|
| + | URL 中+号表示空格 | %2B |
| 空格 | URL中的空格可以用+号或者编码 | %20 |
| / | 分隔目录和子目录 | %2F |
| ? | 分隔实际的URL和参数 | %3F |
| % | 指定特殊字符 | %25 |
| # | 表示书签 | %23 |
| & | URL中指定的参数间的分隔符 | %26 |
| = | URL中指定参数的值 | %3D |
URLEncode和URLDecode
接受参数案例tranIndex
@RestControllerpublic class TranController { // 接受客户端参数 @RequestMapping("/tranIndex") public String tranIndex(String name) { System.out.println("name:" + name); return name; }}
客户端访问结果
传入+参数变为了空格。
解决办法:将+变为%2B
Java代码处理转码
URLEncoder.encode和decode
String encode = URLEncoder.encode("1+1", "UTF-8"); String decode = URLDecoder.decode(encode, "UTF-8"); System.out.println("encode:" + encode + ",decode:" + decode);
Http接口参数编码处理
String url = "http://127.0.0.1:8080/tranIndex?"; // 参数转码 String strParam = "name=" + URLEncoder.encode("1+1", "utf-8"); String newUrl = url + strParam; String result = HttpClientUtils.httpGet(newUrl); System.out.println("result:" + result);
Api接口访问演示地址
使用令牌方式搭建搭建API开放平台
原理:为每个合作机构创建对应的appid、app_secret,生成对应的access_token(有效期2小时),在调用外网开放接口的时候,必须传递有效的access_token。
数据库表设计
CREATE TABLE m_app ( id int(11) NOT NULL AUTO_INCREMENT, app_name varchar(255) DEFAULT NULL, app_id varchar(255) DEFAULT NULL, app_secret varchar(255) DEFAULT NULL, is_flag varchar(255) DEFAULT NULL, access_token varchar(255) DEFAULT NULL, PRIMARY KEY (id)) ENGINE=InnoDB AUTO_INCREMENT=2 DEFAULT CHARSET=utf8;
App_Name 表示机构名称
App_ID 应用id
App_Secret 应用密钥 (可更改)
Is_flag 是否可用 (是否对某个机构开放)
access_token 上一次access_token
获取AccessToken
// 创建获取getAccessToken@RestController@RequestMapping(value = "/auth")public class AuthController extends BaseApiService { @Autowired private BaseRedisService baseRedisService; private long timeToken = 60 * 60 * 2; @Autowired private AppMapper appMapper; // 使用appId+appSecret 生成AccessToke @RequestMapping("/getAccessToken") public ResponseBase getAccessToken(AppEntity appEntity) { AppEntity appResult = appMapper.findApp(appEntity); if (appResult == null) { return setResultError("没有对应机构的认证信息"); } int isFlag = appResult.getIsFlag(); if (isFlag == 1) { return setResultError("您现在没有权限生成对应的AccessToken"); } // ### 获取新的accessToken 之前删除之前老的accessToken // 从redis中删除之前的accessToken String accessToken = appResult.getAccessToken(); baseRedisService.delKey(accessToken); // 生成的新的accessToken String newAccessToken = newAccessToken(appResult.getAppId()); JSONObject jsonObject = new JSONObject(); jsonObject.put("accessToken", newAccessToken); return setResultSuccessData(jsonObject); } private String newAccessToken(String appId) { // 使用appid+appsecret 生成对应的AccessToken 保存两个小时 String accessToken = TokenUtils.getAccessToken(); // 保证在同一个事物redis 事物中 // 生成最新的token key为accessToken value 为 appid baseRedisService.setString(accessToken, appId, timeToken); // 表中保存当前accessToken appMapper.updateAccessToken(accessToken, appId); return accessToken; }}
编写拦截器拦截请求,验证accessToken
//验证AccessToken 是否正确@Componentpublic class AccessTokenInterceptor extends BaseApiService implements HandlerInterceptor { @Autowired private BaseRedisService baseRedisService; /* * 进入controller层之前拦截请求 * * @param httpServletRequest * @param httpServletResponse * @param o * @return * @throws Exception / *public** boolean preHandle(HttpServletRequest httpServletRequest, HttpServletResponse httpServletResponse, Object o) throws Exception { System.out.println("---------------------开始进入请求地址拦截----------------------------"); String accessToken = httpServletRequest.getParameter("accessToken"); // 判断accessToken是否空 if (StringUtils.*isEmpty(accessToken)) { // 参数Token accessToken resultError(" this is parameter accessToken null ", httpServletResponse); return false; } String appId = (String) baseRedisService.getString(accessToken); if (StringUtils.isEmpty(appId)) { // accessToken 已经失效! resultError(" this is accessToken Invalid ", httpServletResponse); return false; } // 正常执行业务逻辑... return true; } public void postHandle(HttpServletRequest httpServletRequest, HttpServletResponse httpServletResponse, Object o, ModelAndView modelAndView) throws Exception { System.out.println("--------------处理请求完成后视图渲染之前的处理操作---------------"); } public void afterCompletion(HttpServletRequest httpServletRequest, HttpServletResponse httpServletResponse, Object o, Exception e) throws Exception { System.out.println("---------------视图渲染之后的操作-------------------------0"); } // 返回错误提示 public void resultError(String errorMsg, HttpServletResponse httpServletResponse) throws IOException { PrintWriter printWriter = httpServletResponse.getWriter(); printWriter.write(new JSONObject().toJSONString(setResultError(errorMsg))); } }
- 生成登陆授权连接
https://graph.qq.com/oauth2.0/authorize?response_type=code&client_id=101441562
&redirect_uri= http://localhost/qqCallBack/test&state=1111&scope= get_user_info
2.如果用户成功登录并授权,则会跳转到指定的回调地址,并在redirect_uri地址后带上Authorization Code和原始的state值。如:
http://www.itmayiedu.com/loginQu/oauth/qq/callback?code=644064& state=test
注意:此code会在10分钟内过期
基于OAuth2.0协议方式
什么是OAuth
OAuth: OAuth(开放授权)是一个开放标准,允许用户授权第三方网站访问他们存储在另外的服务提供者上的信息,而不需要将用户名和密码提供给第三方网站或分享他们数据的所有内容。
OAuth2.0
对于用户相关的OpenAPI(例如获取用户信息,动态同步,照片,日志,分享等),为了保护用户数据的安全和隐私,第三方网站访问用户数据前都需要显式的向用户征求授权。
QQ登录OAuth2.0采用OAuth2.0标准协议来进行用户身份验证和获取用户授权,相对于之前的OAuth1.0协议,其认证流程更简单和安全。
OAuth2.0总体处理流程
1 第一步:用户同意授权,获取code
2 第二步:通过code换取网页授权access_token
3 第三步:刷新access_token(如果需要)
4 第四步:拉取用户信息(需scope为 snsapi_userinfo)
实现微信授权获取信息
微信网页授权地址
https://mp.weixin.qq.com/wiki?t=resource/res_main&id=mp1421140842
https://mp.weixin.qq.com/debug/cgi-bin/sandbox?t=sandbox/login
1.填写网页授权回调地址权限
2.生成网页授权地址
3.跳转到回调地址获取授权码
http://meitedu.s1.natapp.cc/?code=061yIRgM13IOc41ZQveM1tODgM1yIRge&state=STATE
4.通过code换取网页授权access_token
5.拉取用户信息(需scope为 snsapi_userinfo)
信息加密与密钥管理
单向散列加密
散列是信息的提炼,通常其长度要比信息小得多,且为一个固定长度。加密性强的散列一定是不可逆的,这就意味着通过散列结果,无法推出任何部分的原始信息。任何输入信息的变化,哪怕仅一位,都将导致散列结果的明显变化,这称之为雪崩效应。散列还应该是防冲突的,即找不出具有相同散列结果的两条信息。具有这些特性的散列结果就可以用于验证信息是否被修改。
单向散列函数一般用于产生消息摘要,密钥加密等,常见的有:
1、MD5(Message Digest Algorithm 5):是RSA数据安全公司开发的一种单向散列算法,非可逆,相同的明文产生相同的密文。
2、SHA(Secure Hash Algorithm):可以对任意长度的数据运算生成一个160位的数值;
SHA-1与MD5的比较
因为二者均由MD4导出,SHA-1和MD5彼此很相似。相应的,他们的强度和其他特性也是相似,但还有以下几点不同:
1、对强行供给的安全性:最显著和最重要的区别是SHA-1摘要比MD5摘要长32 位。使用强行技术,产生任何一个报文使其摘要等于给定报摘要的难度对MD5是2128数量级的操作,而对SHA-1则是2160数量级的操作。这样,SHA-1对强行攻击有更大的强度。
2、对密码分析的安全性:由于MD5的设计,易受密码分析的攻击,SHA-1显得不易受这样的攻击。
3、速度:在相同的硬件上,SHA-1的运行速度比MD5慢。
1、特征:雪崩效应、定长输出和不可逆。
2、作用是:确保数据的完整性。
3、加密算法:md5(标准密钥长度128位)、sha1(标准密钥长度160位)、md4、CRC-32
4、加密工具:md5sum、sha1sum、openssl dgst。
5、计算某个文件的hash值,例如:md5sum/shalsum FileName,openssl dgst –md5/-sha
MD5加密
在线MD5解密与加密
Java操作MD5加密
MD5加盐实现方式
一般使用的加盐:
md5(Password+UserName),即将用户名和密码字符串相加再MD5,这样的MD5摘要基本上不可反查。
但有时候用户名可能会发生变化,发生变化后密码即不可用了(验证密码实际上就是再次计算摘要的过程)。
----------
因此我们做了一个非常简单的加盐算法,每次保存密码到数据库时,都生成一个随机16位数字,将这16位数字和密码相加再求MD5摘要,然后在摘要中再将这16位数字按规则掺入形成一个48位的字符串。
在验证密码时再从48位字符串中按规则提取16位数字,和用户输入的密码相加再MD5。按照这种方法形成的结果肯定是不可直接反查的,且同一个密码每次保存时形成的摘要也都是不同的。
代码如下:
/* * MD5加盐加密 /*public** class PasswordUtil { /** * 生成含有随机盐的密码 / *public** static String generate(String password) { Random r = new Random(); StringBuilder sb = new StringBuilder(16); sb.append(r.nextInt(99999999)).append(r.nextInt(99999999)); int len = sb.length(); if (len < 16) { for (int i = 0; i < 16 - len; i++) { sb.append("0"); } } String salt = sb.toString(); password = *md5Hex(password + salt); char[] cs = new char[48]; for (int i = 0; i < 48; i += 3) { cs[i] = password.charAt(i / 3 * 2); char c = salt.charAt(i / 3); cs[i + 1] = c; cs[i + 2] = password.charAt(i / 3 * 2 + 1); } return new String(cs); } /* * 校验密码是否正确 / *public** static boolean verify(String password, String md5) { char[] cs1 = new char[32]; char[] cs2 = new char[16]; for (int i = 0; i < 48; i += 3) { cs1[i / 3 * 2] = md5.charAt(i); cs1[i / 3 * 2 + 1] = md5.charAt(i + 2); cs2[i / 3] = md5.charAt(i + 1); } String salt = new String(cs2); return *md5Hex(password + salt).equals(new String(cs1)); } /* * 获取十六进制字符串形式的MD5摘要 / *public** static String md5Hex(String src) { try { MessageDigest md5 = MessageDigest.*getInstance("MD5"); byte[] bs = md5.digest(src.getBytes()); return new String(new Hex().encode(bs)); } catch (Exception e) { return null; } } public static void main(String[] args) { // 加密+加盐 String password1 = generate("admin"); System.out.println("结果:" + password1 + " 长度:" + password1.length()); // 解码 System.out.println(verify("admin", password1)); // 加密+加盐 String password2 = generate("admin"); System.out.println("结果:" + password2 + " 长度:" + password2.length()); // 解码 System.out.println(verify("admin", password2)); }}
信息加密技术
对称加密
对称密码技术:发件人和收件人使用其共同拥有的单个密钥 ,这种密钥既用于加密,也用于解密,叫做机密密钥(也称为对称密钥或会话密钥)。
能够提供信息机密性(没有密钥信息不能被解密)、完整性(被改变的信息不能被解密)的服务。
对称式密码学又称:单钥密码学、秘密密钥密码学、会话密钥密码学、私钥密码学、共享秘钥密码学
常见的对称式加密技术
DES(数据加密标准):分组式加密,算法源于Lucifer,作为NIST对称式加密标准;64位(有效位56位、校验8位),分组算法
3DES:128位,分组算法
IDEA(国际数据加密算法):128位,比DES快,分组算法
Blowfish:32-448位,算法公开,分组算法
RC4:流密码,密钥长度可变
RC5:分组密码,密钥长度可变,最大2048位
Rijndael:128位/196位/256位
AES(高级加密标准):DES升级版,算法出自Rinjindael
对称密码的优点
用户只需记忆一个密钥,就可用于加密、解密;
与非对称加密方法相比,加密解密的计算量小,速度快,简单易用,适合于对海量数据进行加密处理 。
对称密码的缺点
如果密钥交换不安全,密钥的安全性就会丧失。特别是在电子商务环境下,当客户是未知的、不可信的实体时,如何使客户安全地获得密钥就成为一大难题。
如果用户较多情况下的密钥管理问题。N*(N-1)/2
如果密钥多个用户被共享,不能提供抗抵赖性
对称密码案例
假设Alice和Bob是认识的,两人为了保证通信消息不被其它人截取,预先约定了一个密码,用来加密在他们之间传送的消息,这样即使有人截取了消息没有密码也无法知道消息的内容。由此便实现了机密性。
基于DES实现加密和解密
DES加密工具类
/* * DES加密介绍 DES是一种对称加密算法,所谓对称加密算法即:加密和解密使用相同密钥的算法。DES加密算法出自IBM的研究, * 后来被美国政府正式采用,之后开始广泛流传,但是近些年使用越来越少,因为DES使用56位密钥,以现代计算能力, * 24小时内即可被破解。虽然如此,在某些简单应用中,我们还是可以使用DES加密算法,本文简单讲解DES的JAVA实现 。 * 注意:DES加密和解密过程中,密钥长度都必须是8的倍数 /*public** class DES { public DES() { } // 测试 public static void main(String args[]) { // 待加密内容 String str = "cryptology"; // 密码,长度要是8的倍数 String password = "95880288"; byte[] result = DES.*encrypt(str.getBytes(), password); System.out.println("加密后:" + new String(result)); // 直接将如上内容解密 try { byte[] decryResult = DES.decrypt(result, password); System.out.println("解密后:" + new String(decryResult)); } catch (Exception e1) { e1.printStackTrace(); } } /* * 加密 * * @param datasource * byte[] * @param password * String * @return byte[] / *public** static byte[] encrypt(byte[] datasource, String password) { try { SecureRandom random = new SecureRandom(); DESKeySpec desKey = new DESKeySpec(password.getBytes()); // 创建一个密匙工厂,然后用它把DESKeySpec转换成 SecretKeyFactory keyFactory = SecretKeyFactory.*getInstance("DES"); SecretKey securekey = keyFactory.generateSecret(desKey); // Cipher对象实际完成加密操作 Cipher cipher = Cipher.getInstance("DES"); // 用密匙初始化Cipher对象,ENCRYPT_MODE用于将 Cipher 初始化为加密模式的常量 cipher.init(Cipher.ENCRYPT_MODE, securekey, random); // 现在,获取数据并加密 // 正式执行加密操作 return cipher.doFinal(datasource); // 按单部分操作加密或解密数据,或者结束一个多部分操作 } catch (Throwable e) { e.printStackTrace(); } return null; } /* * 解密 * * @param src * byte[] * @param password * String * @return byte[] * @throws Exception / *public** static byte[] decrypt(byte[] src, String password) throws Exception { // DES算法要求有一个可信任的随机数源 SecureRandom random = new SecureRandom(); // 创建一个DESKeySpec对象 DESKeySpec desKey = new DESKeySpec(password.getBytes()); // 创建一个密匙工厂 SecretKeyFactory keyFactory = SecretKeyFactory.*getInstance("DES");// 返回实现指定转换的 // Cipher // 对象 // 将DESKeySpec对象转换成SecretKey对象 SecretKey securekey = keyFactory.generateSecret(desKey); // Cipher对象实际完成解密操作 Cipher cipher = Cipher.getInstance("DES"); // 用密匙初始化Cipher对象 cipher.init(Cipher.DECRYPT_MODE, securekey, random); // 真正开始解密操作 return cipher.doFinal(src); }}
DES加解密案例
public class Demo01 { // 1.配置密钥 private static String PASSWORD = "95880288"; public static void main(String[] args) throws Exception { // 2.需要加密的内容 String content = "yushengjun"; // 3.使用DES 加密 byte[] encryptContent = DES.encrypt(content.getBytes(), PASSWORD); System.out.println("加密后内容:" + new String(encryptContent)); // 4.使用DES 解密 byte[] decrypt = DES.decrypt(encryptContent, PASSWORD); System.out.println("解密后内容:" + new String(decrypt)); } }
非对称加密
使用一对密钥:一个用于加密信息,另一个则用于解密信息。
两个密钥之间存在着相互依存关系:即用其中任一个密钥加密的信息只能用另一个密钥进行解密。
其中加密密钥不同于解密密钥,公钥加密私钥解密,反之也可私钥加密公钥解密。
密钥依据性质划分,将其中的一个向外界公开,称为公钥;另一个则自己保留,称为私钥。公钥(Public key)常用于数据加密(用对方公钥加密)或签名验证(用对方公钥解密),私钥(Private key)常用于数据解密(发送方用接收方公钥加密)或数字签名(用自己私钥加密)。
机密性、完整性、抗抵赖性
1.使用过程:
乙方生成两把密钥(公钥和私钥)
甲方获取乙方的公钥,然后用它对信息加密。
乙方得到加密后的信息,用私钥解密,乙方也可用私钥加密字符串
甲方获取乙方私钥加密数据,用公钥解密
优点:难破解
缺点: 加密速度慢
常用算法:
RSA、Elgamal、背包算法、Rabin、D-H、ECC(椭圆曲线加密算法)
RSA 工具类
/* * RSA加解密工具类 * * @author QiuFeihu * /*public** class RSAUtil { public static String *publicKey; // 公钥 public static String privateKey; // 私钥 /* * 生成公钥和私钥 / *public** static void generateKey() { // 1.初始化秘钥 KeyPairGenerator keyPairGenerator; try { keyPairGenerator = KeyPairGenerator.*getInstance("RSA"); SecureRandom sr = new SecureRandom(); // 随机数生成器 keyPairGenerator.initialize(512, sr); // 设置512位长的秘钥 KeyPair keyPair = keyPairGenerator.generateKeyPair(); // 开始创建 RSAPublicKey rsaPublicKey = (RSAPublicKey) keyPair.getPublic(); RSAPrivateKey rsaPrivateKey = (RSAPrivateKey) keyPair.getPrivate(); // 进行转码 publicKey = Base64.encodeBase64String(rsaPublicKey.getEncoded()); // 进行转码 privateKey = Base64.encodeBase64String(rsaPrivateKey.getEncoded()); } catch (NoSuchAlgorithmException e) { // TODO Auto-generated catch block e.printStackTrace(); } } /* * 私钥匙加密或解密 * * @param content * @param privateKeyStr * @return / *public** static String encryptByprivateKey(String content, String privateKeyStr, int opmode) { // 私钥要用PKCS8进行处理 PKCS8EncodedKeySpec pkcs8EncodedKeySpec = new PKCS8EncodedKeySpec(Base64.*decodeBase64(privateKeyStr)); KeyFactory keyFactory; PrivateKey privateKey; Cipher cipher; byte[] result; String text = null; try { keyFactory = KeyFactory.getInstance("RSA"); // 还原Key对象 privateKey = keyFactory.generatePrivate(pkcs8EncodedKeySpec); cipher = Cipher.getInstance("RSA"); cipher.init(opmode, privateKey); if (opmode == Cipher.ENCRYPT_MODE) { // 加密 result = cipher.doFinal(content.getBytes()); text = Base64.encodeBase64String(result); } else if (opmode == Cipher.DECRYPT_MODE) { // 解密 result = cipher.doFinal(Base64.decodeBase64(content)); text = new String(result, "UTF-8"); } } catch (Exception e) { // TODO Auto-generated catch block e.printStackTrace(); } return text; } /* * 公钥匙加密或解密 * * @param content * @param privateKeyStr * @return / *public** static String encryptByPublicKey(String content, String publicKeyStr, int opmode) { // 公钥要用X509进行处理 X509EncodedKeySpec x509EncodedKeySpec = new X509EncodedKeySpec(Base64.*decodeBase64(publicKeyStr)); KeyFactory keyFactory; PublicKey publicKey; Cipher cipher; byte[] result; String text = null; try { keyFactory = KeyFactory.getInstance("RSA"); // 还原Key对象 publicKey = keyFactory.generatePublic(x509EncodedKeySpec); cipher = Cipher.getInstance("RSA"); cipher.init(opmode, publicKey); if (opmode == Cipher.ENCRYPT_MODE) { // 加密 result = cipher.doFinal(content.getBytes()); text = Base64.encodeBase64String(result); } else if (opmode == Cipher.DECRYPT_MODE) { // 解密 result = cipher.doFinal(Base64.decodeBase64(content)); text = new String(result, "UTF-8"); } } catch (Exception e) { // TODO Auto-generated catch block e.printStackTrace(); } return text; } // 测试方法 public static void main(String[] args) { /* * 注意: 私钥加密必须公钥解密 公钥加密必须私钥解密 / System.*out*.println("-------------生成两对秘钥,分别发送方和接收方保管-------------"); RSAUtil.generateKey(); System.out.println("公钥匙给接收方:" + RSAUtil.publicKey); System.out.println("私钥给发送方:" + RSAUtil.privateKey); System.out.println("-------------第一个栗子,私钥加密公钥解密-------------"); // String textsr = "早啊,你吃早饭了吗?O(∩_∩)O"; // // 私钥加密 // String cipherText = RSAUtil.encryptByprivateKey(textsr, // RSAUtil.privateKey, Cipher.ENCRYPT_MODE); // System.out.println("发送方用私钥加密后:" + cipherText); // // 公钥解密 // String text = RSAUtil.encryptByPublicKey(cipherText, // RSAUtil.publicKey, Cipher.DECRYPT_MODE); // System.out.println("接收方用公钥解密后:" + text); System.out.println("-------------第二个栗子,公钥加密私钥解密-------------"); // 公钥加密 String textsr = "吃过啦!你吃了吗?O(∩_∩)O"; String cipherText = RSAUtil.encryptByPublicKey(textsr, RSAUtil.publicKey, Cipher.ENCRYPT_MODE); System.out.println("接收方用公钥加密后:" + cipherText); // 私钥解密 String text = RSAUtil.encryptByprivateKey(cipherText, RSAUtil.privateKey, Cipher.DECRYPT_MODE); System.out.print("发送方用私钥解密后:" + text); } }
使用公钥加密和私钥解密案例
public static void main(String[] args) { // 1. 生成(公钥和私钥)密钥对 RSAUtil.generateKey(); System.out.println("公钥:" + RSAUtil.publicKey); System.out.println("私钥:" + RSAUtil.privateKey); System.out.println("----------公钥加密私钥解密-------------"); // 使用 公钥加密,私钥解密 String textsr = "yushengjun"; String encryptByPublic = RSAUtil.encryptByPublicKey(textsr, RSAUtil.publicKey, Cipher.ENCRYPT_MODE); System.out.println("公钥加密:" + encryptByPublic); String text = RSAUtil.encryptByprivateKey(encryptByPublic, RSAUtil.privateKey, Cipher.DECRYPT_MODE); System.out.print("私钥解密:" + text); }
使用私钥加密和公钥解密案例
// 1. 生成(公钥和私钥)密钥对 RSAUtil.generateKey(); System.out.println("公钥:" + RSAUtil.publicKey); System.out.println("私钥:" + RSAUtil.privateKey); System.out.println("----------私加密公钥解密-------------"); // 使用 私加密,公钥解密 String textsr = "yushengjun"; String encryptByprivate = RSAUtil.encryptByprivateKey(textsr, RSAUtil.privateKey, Cipher.ENCRYPT_MODE); System.out.println("私钥加密后:" + encryptByprivate); String encryptByPublic = RSAUtil.encryptByPublicKey(encryptByprivate, RSAUtil.publicKey, Cipher.DECRYPT_MODE); System.out.println("公钥解密后:" + encryptByPublic);
基于令牌方式隐藏参数
@RestControllerpublic class PayController extends BaseApiService { @Autowired private BaseRedisService baseRedisService; private static long timeToken = 15 * 60l; @RequestMapping("/pay") public ResponseBase pay(String token) { // 获取提交参数 数据库保存., if (StringUtils.isEmpty(token)) { return setResultError("token 不能为空!"); } String reuslt = (String) baseRedisService.getString(token); if (StringUtils.isEmpty(reuslt)) { return setResultError("参数不能空!"); } System.out.println("获取提交的参数reuslt:" + reuslt); return setResultSuccess("获取提交的参数reuslt:" + reuslt); } @RequestMapping("/getPayToken") public String pay(Long userId, Long money) { String payToken = UUID.randomUUID().toString(); baseRedisService.setString(payToken, userId + "-" + money, timeToken); return payToken; } }